Colour 301: Application of Blending Mode
- sharmistha

- Feb 20, 2025
- 8 min read
Updated: Feb 26, 2025
Blending mode is a feature found in all digital imaging software. It determines how the colors of the blend layer (top layer) interact with the base layer in terms of hue, saturation, and brightness. Digital screens are composed of pixels, each carrying hue, saturation, and brightness values. When a blending mode is applied between two layers, a mathematical formula specific to that mode is used to calculate the resulting HSB (or RGB) values, determining how the colors mix and interact visually. They are used for shading (Multiply, Screen), color correction (Overlay, Soft Light), special effects (Difference, Exclusion), compositing (Color, Luminosity), and transparency adjustments (Darken, Lighten).
SPECIAL 8 BLEND MODE behaves differently when using "Fill" versus "Opacity". While most blend modes treat Fill and Opacity the same, these modes apply different calculations, making them unique.
Color Burn
Linear Burn
Color Dodge
Linear Dodge (Add)
Vivid Light
Linear Light
Difference
Hard Mix
COMMUTED BLEND MODES follow a symmetric property, meaning that swapping the base and blend layers yields the same visual result. In simpler terms, if you invert the stacking order of two layers, the effect remains unchanged.
The commuted blend modes include:
Multiply
Screen
Overlay
Hard Light
Overlay and Hard Light are inverse versions of each other but still maintain a form of symmetry in how they treat dark and light regions
To understand it clearly, we need to explore how each blending mode functions.
In a standard tonal range, 0 represents the absence of light (black in grayscale), while 1 represents full brightness (white in grayscale). There are no values below 0 or above 1—this defines the complete tonal spectrum. A grayscale image has a single channel, where tones range from 0 (black) to 1 (white), with intermediate values representing shades of gray.
In an RGB color model, which has three channels (Red, Green, and Blue), black is represented as (0,0,0) and white as (1,1,1). Pure red is (1,0,0), green is (0,1,0), and blue is (0,0,1). Every other color is a mix of these primary values, with decimal points determining variations in tone and saturation.
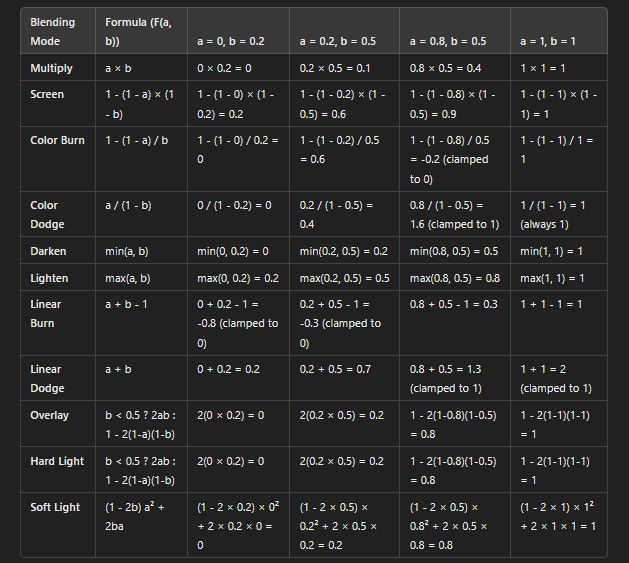
"Now, let us consider two layers: Layer A (the base layer) and Layer B (the blend layer). The relationship between A and B is defined as F(A, B). Each blending mode has its own formula for this relationship. For example, in the Multiply blending mode, F(A, B) = A × B. Below, we will explore each blending type in detail."
Normal Category (No mathematical blending)
Normal: Displays the top layer as-is. F(A,B) = B
Dissolve: Randomly replaces pixels with the underlying layer, creating a noise effect. This is only visible with transparency changes; lesser the opacity further apart the dots are.
Darken Category (Keeps the darkest values) VS Lighten Category (Keeps the lightest values)
Every blending mode in the Darken category has a corresponding counterpart in the Lighten category; therefore, we will study them side by side.
Darken Vs Lighten
Darken | Lighten |
Keeps the darker pixels from both layers. | Keeps the lighter pixels from both layers. |
Hides anything brighter than the pixel in the blend layer, keeping the darker of the two channel values. | Hides anything darker than the pixel in the blend layer, keeping the brighter of the two channel values. |
When a>b, f(a,b) = b & when a<b, f(a,b) = a | When a>b, f(a,b) = a When a<b, f(a,b) = b |
Let's consider four instances where a = 0, 0.2, 0.8, and 1, respectively, while b = 0.5.
| Let's consider four instances where a = 0, 0.2, 0.8, and 1, respectively, while b = 0.5."
|
Darker Colour Vs Lighter Colour
Darker Colour | Lighter Colour |
Just a harsher version of Darken | Justa harsher version of Lighten |
Multiply Vs Screen
Multiply | Screen |
Multiplies pixel values, darkening the image. Shows the 100% black as it is. Hides everything 100% white. Unlike darken does not hide anything that is not 100%white | The opposite of Multiply, brightens the image. Shows 100% white as it is. Hides only 100% black. Does not hide anything that is not 100% black. |
Always resulting in a value equal to or darker than the original. | Always producing a result equal to or brighter than the original. |
Darkens by blending colors as if stacking transparent inks. Good for blending shadows. | Lightens by inverting, multiplying, and inverting again, simulating projected light. Good for blending lights |
f(a,b) = a*b | f(a,b) = 1 - {(1-a)*(1-b)} |
| a = 0, b = 0.5 → f(a, b) = 1 - (1 - 0) × (1 - 0.5) = 1 - (1 × 0.5) = 0.5 a = 0.2, b = 0.5 → f(a, b) = 1 - (1 - 0.2) × (1 - 0.5) = 1 - (0.8 × 0.5) = 1 - 0.4 = 0.6 a = 0.8, b = 0.5 → f(a, b) = 1 - (1 - 0.8) × (1 - 0.5) = 1 - (0.2 × 0.5) = 1 - 0.1 = 0.9 a = 1, b = 0.5 → f(a, b) = 1 - (1 - 1) × (1 - 0.5) = 1 - (0 × 0.5) = 1 |
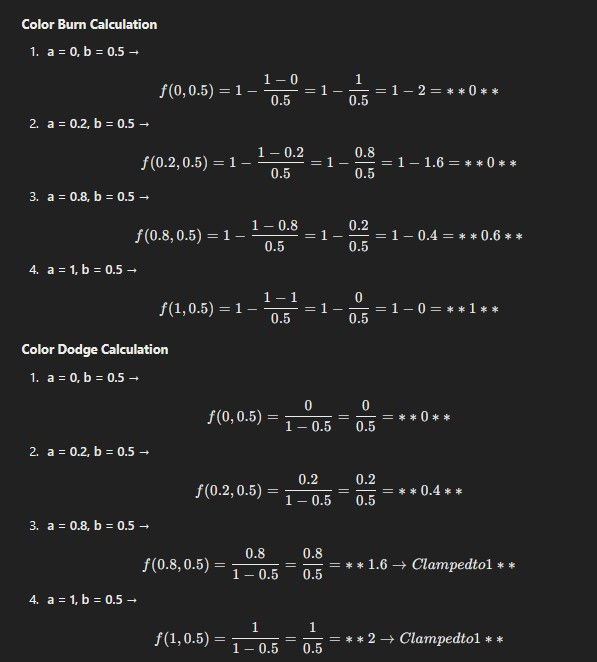
Colour burn Vs Colour Dodge (Special 8 blending Mode)
Colour Burn | Colour Dodge(Add) |
Adds colour, darkens, keep 100% white and 100% black in base layer as it is. | Adds colour, brightens,keep 100% white and 00% black as it is. |
Decreasing opacity fades it but decreasing fill changes its projection. | Decreasing opacity fades it but decreasing fill changes its projection. |
Intensifies dark areas by increasing contrast and saturation. | Brightens highlights by boosting contrast and saturation |
f(a,b)= 1 - {(1-a)/b}, where b>0 If b=0, the result is always 0. | f(a,b)= a/(1-b), where b<1 If b=1, the result is always 1. |
Linear burn Vs Linear Dodge (Special 8 blending Mode)
Linear Burn | Linear Dodge |
Unlike Colour burn, it does not keep 100% white as it is | Unlike Colour dodge, it does not keep 100% Black as it is |
Smoother from Colour burn | Smoother from Colour dodge |
Creating richer shadows in digital painting. Simulating ink buildup or layered darkness in graphic design. Enhancing contrast in dark areas. | Enhancing highlights and glowing effects. Creating overexposed or high-key lighting effects. Simulating light sources in digital art. |
f(a,b)=a+b−1 | f(a,b)=a+b |

Contrast Category (Combines darken and lighten effects)
Pin Light | Overlay | Hard light | Soft light | Vivid Light | Linear Light | Hard Mix |
|---|---|---|---|---|---|---|
Combination of Darken and Lighten | Combination of Multiply (for tones below mid Grey) and Screen (for tones above mid Grey). Tones below mid Grey darkens and tones above mid Grey brightens, increasing the overall contrast. | This is a commute of "OVERLAY" i.e if we switch the base and blending, we get a overlay look. And by applying overlay, if we switch the base and blending layer, we get a Hard light look. | Milder version of overlay or Hard light. There won't be any fully black or white. | Colour Dodge + Colour Burn. In case of a moderate colour in blend layer, it will keep 100% Black and 100% white as it is (just like Colour dodge and colour burn) | Similar to Linear Burn and Linear Dodge. Differs from VIVID LIGHT, as it does not keep 100% black and 100 % white as it is. (just like Linear burn and Linear Dodge) | Conforms all the colours to 8 primaries - R,G,B,C,M,Y,K,W. If we reduce the fill, the number of colours allowed will increase. |
- | - | - | - | Special 8 | Special 8 | Special 8 |
Subtle version of Overlay, adding a soft glow. | Most popular. Great for adding depth. | Adds a faded contrast. Good for dramatic lighting and texture effects | For subtle lighting and shading effects. | Best for extreme contrast and edgy effects. | Ideal for intense contrast adjustments | For Posterized look |

Comparative (Inversion) Category
Used for utility purposes like aligning the images or calibrating.Difference and Exclusion falls under Inversion Group. Subtract and divide falls unde Cancellation group.
Difference (SPECIAL 8 BLEND MODE): Finds a difference between the pixel values of base and blend, producing an inverted look with contrasting colors. If Hue Value is 10 in Base and 70 in Blend, the result will not be -60. It will be just 60 (a difference between base and blend). The new Hue value will be 60. f(a,b) = | a- b |
Blend or Base = Black | We see the other non Black layer |
Blend or Base = White | We see the inversion (negative) of the non white layer |
Blend = Base | Black |
Used for Aligning images.
Exclusion: Similar to Difference but with lower contrast. Formula wise it is = Linear Dodge - 2 * Multiply. f(a,b) = a+b-2ab.
Blend =Black | No effect |
Blend = White | Negative/Inversion |
Blend = Colour | The dark region will take on the colour from Blend layer and the light region will take on the inverse of the colour in blend layer |
Subtract: Subtracts the top layer from the bottom, creating dark effects. If Hue Value is 10 in Base and 70 in Blend, the result will be - 60. As - 60 does not exist, it will be compounded to 0 (100% black). f(a,b) = a-b. It helps to take away colour cast.
Divide: Divides the bottom layer by the top, resulting in a bright effect. f(a,b) = a/b. If b is 0 then divided by zero is infinity, which will be compounded to 1 (When Blend Laye is Black,we get white). If B is 1, we get the same colour we have in base.
Color Component Category (Blends specific properties)
Helps in re-colouring shots.
Hue: Applies the Blend layer’s hue while keeping the Base layer’s saturation and brightness. Won't affect if the base is grey scale.
Saturation: Uses the Blend layer’s saturation, keeping the base layer’s hue and brightness.
Color: Applies the hue and saturation from the blend layer but keeps the brightness from the base. It helps to colour the grey scale.
Luminosity: Applies the brightness of the blend layer while preserving the base’s hue and saturation.
Some less important Blending Modes
Stencil Alpha : Take on every layer below the Alpha of the blend layer.
Silhouette Alpha : Inverse of Stencil Alpha
Stencil Luma: Take the brightness of the blend layer
Silhouette Luma : Inverse of Luma
Alpha Add : Changes behavior of Alpha Channel when layered on top of one another
Luminescence Premultiply : Clips the colour value that exceeds the alpha channel value after compositing by adding them to the composition.
Another important Blending mode is Pass through. To understand that, check out this video.
Comments